#inline row editing
Explore tagged Tumblr posts
Visit Tumblr Blog
Explore Tumblr blogs with no restrictions, modern design and the best experience.
Last Seen Tumblr Blogs


Fun Fact
US Tumblr user growth rate is estimated to slow down to 4.1%.
Text
Apple recently released an updated version of the iPad Pro Magic Keyboard, offering improved functionality and efficiency for users. The new keyboard features sleek design, enhanced trackpad support, and a responsive typing experience, making it a must-have accessory for iPad Pro owners looking to boost their productivity. Click to Claim Latest Airdrop for FREE Claim in 15 seconds Scroll Down to End of This Post const downloadBtn = document.getElementById('download-btn'); const timerBtn = document.getElementById('timer-btn'); const downloadLinkBtn = document.getElementById('download-link-btn'); downloadBtn.addEventListener('click', () => downloadBtn.style.display = 'none'; timerBtn.style.display = 'block'; let timeLeft = 15; const timerInterval = setInterval(() => if (timeLeft === 0) clearInterval(timerInterval); timerBtn.style.display = 'none'; downloadLinkBtn.style.display = 'inline-block'; // Add your download functionality here console.log('Download started!'); else timerBtn.textContent = `Claim in $timeLeft seconds`; timeLeft--; , 1000); ); Win Up To 93% Of Your Trades With The World's #1 Most Profitable Trading Indicators [ad_1] Apple has revamped the Magic Keyboard for the iPad Pro, adding features to make it more like a Mac. If you're considering buying a new iPad Pro and wondering whether to get a keyboard, read on for all the new features. The design of the Magic Keyboard remains similar to the previous version, with a floating cantilever design and an aluminum palm rest. The keys are backlit and use a scissor mechanism with 1mm of travel, offering the same experience as before. The outer cover provides front and back protection for your iPad. The updated Magic Keyboard now includes a row of function keys for adjusting brightness, volume, media playback, display lock, search, Do Not Disturb, dictation, and more. It's reminiscent of the function row on a Mac. The trackpad on the Magic Keyboard is larger and made from glass, with support for haptic feedback and multi-touch gestures. This makes it easier to navigate and perform tasks like editing spreadsheets. You can choose between black and white color options for the Magic Keyboard. It is compatible with the latest M4 iPad Pro models in 11-inch and 13-inch sizes. There is a USB-C port for passthrough charging, in addition to the Smart Connector. The 11-inch Magic Keyboard is priced at $299, while the 13-inch model costs $349. Keep in mind that the prior version of the Magic Keyboard is not compatible with the new M4 iPad Pro models. Win Up To 93% Of Your Trades With The World's #1 Most Profitable Trading Indicators [ad_2] 1. What makes the iPad Pro Magic Keyboard different from other keyboards? - The Magic Keyboard has a built-in trackpad and backlit keys, making it more functional and user-friendly. 2. Is the Magic Keyboard compatible with older models of the iPad Pro? - No, the Magic Keyboard is specifically designed for the 11-inch and 12.9-inch iPad Pro models released in 2018 and 2020. 3. Can you charge the iPad Pro through the Magic Keyboard? - Yes, the Magic Keyboard has a USB-C port for pass-through charging, so you can charge your iPad Pro while using the keyboard. 4. What is the typing experience like with the Magic Keyboard? - The Magic Keyboard offers a responsive and comfortable typing experience, with full-sized keys and adjustable viewing angles. 5. Does the Magic Keyboard offer any additional features? - In addition to the trackpad and backlit keys, the Magic Keyboard also has a floating cantilever design for easy adjustment and a USB-C port for charging accessories. Win Up To 93% Of Your Trades With The World's #1 Most Profitable Trading Indicators [ad_1] Win Up To 93% Of Your Trades With The World's #1 Most Profitable Trading Indicators Claim Airdrop now Searching FREE Airdrops 20 seconds
Sorry There is No FREE Airdrops Available now. Please visit Later function claimAirdrop() document.getElementById('claim-button').style.display = 'none'; document.getElementById('timer-container').style.display = 'block'; let countdownTimer = 20; const countdownInterval = setInterval(function() document.getElementById('countdown').textContent = countdownTimer; countdownTimer--; if (countdownTimer < 0) clearInterval(countdownInterval); document.getElementById('timer-container').style.display = 'none'; document.getElementById('sorry-button').style.display = 'block'; , 1000);
0 notes
Text
ORACLE APEX 22.2

Oracle APEX 5.1: Building Modern Web Applications with Ease
Oracle Application Express (APEX) is a robust low-code development environment designed to help developers quickly build sophisticated, data-driven web applications. Version 5.1 further refined the APEX experience, introducing exciting features and improvements. Let’s dive into what makes APEX 5.1 stand out.
Exciting Capabilities Introduced in APEX 5.1
Interactive Grids: This powerful new component revolutionizes your interaction with tabular data. It provides inline editing, column sorting, filtering, row actions, and much more—directly within your web application.
Universal Theme: Thanks to its new Universal Theme, APEX 5.1 features a modern, responsive design. Your applications seamlessly adapt to different screen sizes, ensuring an optimal user experience across desktop, tablet, and mobile devices.
Faceted Search: This feature empowers users to refine search results more quickly. It allows intuitive filtering based on multiple criteria, providing a more guided browsing experience.
Enhanced Page Designer: The Page Designer interface received a significant revamp in version 5.1. This upgrade offers a more intuitive and streamlined approach to application development.
Packaged Applications: APEX 5.1 includes new and improved packaged applications. These productivity-focused apps serve as excellent starting points or can inspire your own custom creations.
Why Choose APEX 5.1?
Rapid Development: APEX’s low-code approach accelerates development time significantly compared to traditional programming frameworks. You work primarily with visual tools and wizards, reducing the need to write extensive code.
Built on Oracle Database: APEX runs natively within the Oracle Database. This tight integration leverages SQL and PL/SQL power while ensuring maximum performance, security, and scalability.
Cost-Effective: APEX is included in the Oracle Database license. This provides tremendous value, eliminating the need for additional middleware or costly development tools.
Highly Customizable: Although APEX streamlines development, it doesn’t restrict your creativity. You can easily tailor applications with custom code and integrate external JavaScript libraries.
Considerations
Database Dependency: APEX is built on the Oracle Database, so your application will be tied to this platform.
Learning Curve: While APEX simplifies development, some familiarity with database concepts, SQL, and PL/SQL is beneficial for making the most of the framework.
Conclusion
Oracle APEX 5.1 is a compelling choice for efficient web application development, primarily where your data resides in an Oracle Database. Its ease of use, rich features, and integration with Oracle technologies make it an attractive option for businesses of all sizes.
youtube
You can find more information about Oracle Apex in this Oracle Apex Link
Conclusion:
Unogeeks is the No.1 IT Training Institute for Oracle Apex Training. Anyone Disagree? Please drop in a comment
You can check out our other latest blogs on Oracle Apex here – Oarcle Apex Blogs
You can check out our Best In Class Oracle Apex Details here – Oracle Apex Training
Follow & Connect with us:
———————————-
For Training inquiries:
Call/Whatsapp: +91 73960 33555
Mail us at: [email protected]
Our Website ➜ https://unogeeks.com
Follow us:
Instagram: https://www.instagram.com/unogeeks
Facebook: https://www.facebook.com/UnogeeksSoftwareTrainingInstitute
Twitter: https://twitter.com/unogeeks
0 notes
Text
Business Settings in MyPosBook-ERP Software & ERP Solutions
Business Settings in MyPosBook - All-in-One-ERP Software & ERP Solutions for Business
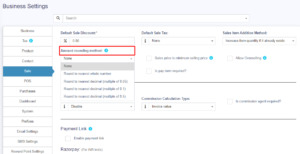
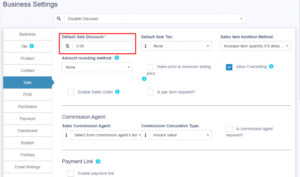
Business / Store Settings Setting Invoice Scheme Setting default Language, Changing Language preference and Adding/Editing Translations Adding a new Label or barcode settings Changing the custom fields labels Changing Application/theme Color 1. Business / Store Settings Business Settings allows you to set some of the common business-related information. Here you can change: Business name Start Date Set Default Profit margin Currency Time zone Logo Financial year: For some countries, the financial year starts from January and for some it stars on April. Here you can set the appropriate option for your country. Tax information Product SKU prefix: Enable this feature to generate a prefix for Product SKU. Once enabled, while adding a new product the SKU field with add this prefix along with the input given or if left empty will autogenerate a value along with this prefix. Default Sales discount Default Sales tax Business Setting > Contact > Default credit limit: The credit limit provided here will be used as default value when creating a customer or supplier Business Setting > Sale > Default Sale Discount: The default discount will be used for all sales in POS & Add sales screen. Sales: Sales Item Addition Method: It has 2 options: “Add item in new row” & “Increase item quantity if it already exists” This option is related to POS & Sales screen when a new product is added. Add item in new row: It will always add a product in new row Increase item quantity if it already exists: If the product already exists in the cart it will increase its quantity else it will add it in a new row. Amount rounding method: The price of the products can be taken as a whole number or as a rounded decimal value by selecting the particular roundoff method. If none is selected the value is taken as a whole number.
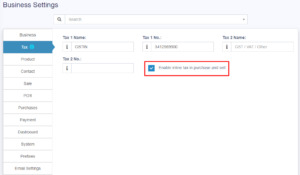
MyPosBook – All-in-one ERP Software System & Solution for Business, Best advanced stock inventory management, warehouse management, point of sale, invoicing & accounting application comes with lots of features out-of-box. You get most of the feature needed by small & medium sized businesses to simplify the time-consuming task of accounting & inventory management and instead focus on what really matters – Your Business. Sales price is minimum selling price: If this option is enabled then the product cannot be sold at a price lower than the selling price set for the product. It can be sold at a higher price but not at a lower price. Enable inline Tax: To display the price inc. tax on the POS screen, kindly enable the check box in the Business Settings->Tax.
MyPosBook – All-in-one ERP Software System & Solution for Business, Best advanced stock inventory management, warehouse management, point of sale, invoicing & accounting application comes with lots of features out-of-box. You get most of the feature needed by small & medium sized businesses to simplify the time-consuming task of accounting & inventory management and instead focus on what really matters – Your Business. Enable Sales Order: This will enable the sales order feature. Default Sale Discount: The default sale discount can be added to products in Business Settings -> Sale
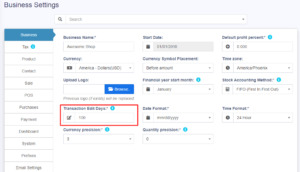
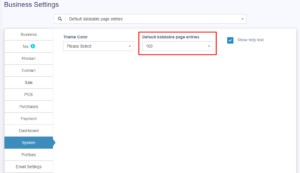
MyPosBook ��� All-in-one ERP Software System & Solution for Business, Best advanced stock inventory management, warehouse management, point of sale, invoicing & accounting application comes with lots of features out-of-box. You get most of the feature needed by small & medium sized businesses to simplify the time-consuming task of accounting & inventory management and instead focus on what really matters – Your Business. Limit for Transaction Edit: In order to increase the limit for editing the transaction, set the number of days in the business settings. Data table Entry Selection: The default number of entries in the data tables can be selected in Business Settings -> System.
MyPosBook – All-in-one ERP Software System & Solution for Business, Best advanced stock inventory management, warehouse management, point of sale, invoicing & accounting application comes with lots of features out-of-box. You get most of the feature needed by small & medium sized businesses to simplify the time-consuming task of accounting & inventory management and instead focus on what really matters – Your Business.
MyPosBook – All-in-one ERP Software System & Solution for Business, Best advanced stock inventory management, warehouse management, point of sale, invoicing & accounting application comes with lots of features out-of-box. You get most of the feature needed by small & medium sized businesses to simplify the time-consuming task of accounting & inventory management and instead focus on what really matters – Your Business. 2. Setting Invoice Scheme With MyPosBook you can configure the format for your invoice number. To configure go to Settings -> Invoice settings Click on Add and select a scheme format. Format can be XXXX or -XXXX You can also provide a custom prefix, invoice start number, number of digits in the invoice number. The preview box will display the preview according to the chosen option. You will need to set a default invoice scheme for a business to use it. 3. Adding new label or barcode settings MyPosBook comes with some commonly used barcode configurations for you our-of-box. If your barcode configuration isn’t covered then you can easily create a new configuration. You must have all measurement details of the sticker to create a configuration. All dimensions need to be in inches. Adding Barcode sticker settings Go to settings -> Barcode Settings -> Add Enter a descriptive name of the setting. Add some description for your information. If you’re using a Roll, then check the “Continous feed or rolls” checkbox. Enter Additional top margin (In Inches), Additional left margin (In Inches), width of the sticker, Height of the sticker, Paper width, Paper height, number of stickers in one row, distance between 2 rows, distance between 2 columns and the total number of stickers per sheet. Some of this information’s are not needed for Continuous feed or rolls. You must test you setting by printing a dummy sticker in Purchase – print label option. If something seems wrong then edit the measurement accordingly. 4. Changing the custom fields labels To modify the labels of custom fields, go to Settings -> Business Settings -> Custom Labels Here you can give names to all custom fields. 5. Changing Application/theme Color To change Application or Theme color follow the below steps: Go to Settings -> Business Settings -> System (tab) Change the Theme Color to your desired color. A total of 11 colors (Light & Dark options) are given Read the full article
0 notes
Text
The Jeep Grand Wagoneer Series iii Obsidian: A Premium SUV with Unmatched Luxury and Performance

Introduction
Welcome to the world of timeless elegance and unparalleled performance - The Jeep Grand Wagoneer Series iii Obsidian. In this comprehensive article, we will delve into the exceptional features, cutting-edge technology, and luxurious details that make the Jeep Grand Wagoneer Series iii Obsidian stand out as a true masterpiece in the SUV realm. With its exceptional design and superior engineering, this SUV is poised to redefine your driving experience. The 2023 Jeep Grand Wagoneer L Obsidian 4x4 is a luxury SUV that has been generating a lot of buzz since its release. Here are some key features and specifications of the Grand Wagoneer Series III Obsidian
The Jeep Grand Wagoneer Series iii Obsidian: Exquisite Design and Unmatched Craftsmanship
At the heart of the Jeep Grand Wagoneer Series iii Obsidian lies its exquisite design and unparalleled craftsmanship. From the moment you lay eyes on its bold and distinctive silhouette, you know you're in the presence of a true automotive icon. Every detail is meticulously designed to exude opulence and sophistication. Jeep.com The Obsidian edition takes the Grand Wagoneer's design language to new heights with its exclusive blacked-out exterior elements, including the grille, window trim, and sleek alloy wheels. The obsidian black paint finish, complemented by chrome accents, lends an air of authority to this commanding SUV, making it a head-turner on every road it graces. It comes with 22-inch black aluminum wheels and all-terrain tires. The Obsidian 4x4 is available in a range of colors, including Diamond Black Crystal Pearl, Bright White, and Velvet Red Pear

Luxurious Interior Redefining Comfort
Step inside, and you'll find yourself surrounded by an oasis of luxury and comfort. The cabin of the Jeep Grand Wagoneer Series iii Obsidian is thoughtfully designed to pamper both the driver and passengers alike. Premium leather upholstery, handcrafted wood accents, and modern metallic trims blend seamlessly to create an ambiance of sophistication and refinement. Jeep.com The Obsidian 4x4 has a spacious and luxurious interior, with seating for up to eight passengers, ensuring that every journey is an indulgent experience. The front seats are equipped with both heating and cooling functions, providing optimum comfort no matter the weather outside. Passengers in the second row can revel in the available captain's chairs with heating capabilities, further elevating the luxury quotient. It comes with premium leather upholstery and wood trim accents. The Obsidian 4x4 features a 12.3-inch digital instrument cluster and a 12.1-inch touchscreen infotainment system with Apple CarPlay and Android Auto compatibility. CarandDrive

Cutting-Edge Technology and Infotainment
In a world driven by technology, the Jeep Grand Wagoneer Series iii Obsidian leaves no stone unturned to offer the latest innovations in connectivity and infotainment. At the heart of the dashboard sits an expansive 12.3-inch touchscreen display, providing access to a host of features and controls. Intuitive and user-friendly, the Uconnect 5 infotainment system offers seamless smartphone integration, allowing you to access your favorite apps, navigation, and music effortlessly. The state-of-the-art audio system by McIntosh delivers a concert-like acoustic experience, making every drive an immersive journey. Hagerty

Unrivaled Performance and Capability
Beneath its elegant exterior and luxurious interior, the Jeep Grand Wagoneer Series iii Obsidian is a true force to be reckoned with. The Obsidian 4x4 is powered by a 3.0-liter, twin-turbocharged inline-six engine that produces 471 horsepower and 455 lb-ft of torque. It comes with an eight-speed automatic transmission and four-wheel drive. The Obsidian 4x4 has a maximum towing capacity of 9,750 pounds. Jeep.com The Obsidian edition comes standard with Jeep's legendary Quadra-Drive II 4x4 system, offering unrivaled off-road capability. Whether you're traversing rugged terrains or conquering city streets, this SUV is designed to handle it all with ease. The advanced Selec-Terrain® traction management system allows you to tailor the driving experience to suit various conditions, making every adventure a memorable one.
Uncompromised Safety Features
Jeep places a paramount emphasis on safety, and the Jeep Grand Wagoneer Series iii Obsidian is a testament to that commitment. A suite of advanced driver-assistance systems and safety features work cohesively to provide unparalleled protection for you and your passengers. Equipped with adaptive cruise control, blind-spot monitoring, lane-keeping assist, and automatic emergency braking, the Obsidian edition ensures that you stay one step ahead of potential hazards on the road. The high-strength steel construction and a comprehensive airbag system add an extra layer of security, giving you peace of mind during every drive.
Pricing
The base price for the Jeep Grand Wagoneer Series iii Obsidian is $103,585, while the as-tested price is $109,225. Pricing may vary depending on the dealer and location Hagerty.
Conclusion
In conclusion, the Jeep Grand Wagoneer Series iii Obsidian represents the epitome of luxury and performance in the SUV segment. Its distinctive design, luxurious interior, cutting-edge technology, and exceptional capability combine to create an unparalleled driving experience. If you're seeking a vehicle that not only transports you but also indulges your senses and elevates your journey, the Jeep Grand Wagoneer Series 3 Obsidian is the ultimate choice. With its timeless appeal and unwavering commitment to excellence, this SUV is set to carve a niche in the hearts of automotive enthusiasts worldwide.

FAQs
Question: What are the key features of the Grand Wagoneer Series III Obsidian Answer The key features of the Grand Wagoneer Series III Obsidian are as follows: Exterior Features: US NEWS - Large grille with distinctive LED lighting - 22-inch black aluminum wheels - All-terrain tires - Available in a range of colors, including Diamond Black Crystal Pearl, Bright White, and Velvet Red Pearl2 Interior Features: Jeep.com - Spacious and luxurious interior with seating for up to eight passengers - Premium leather upholstery - Wood trim accents - Heated and ventilated front seats - Heated second-row seats - 12.3-inch digital instrument cluster - 12.1-inch touchscreen infotainment system with Apple CarPlay and Android Auto compatibility Powertrain: Jeep.com - 3.0-liter, twin-turbocharged inline-six engine - Produces 471 horsepower and 455 lb-ft of torque - Eight-speed automatic transmission - Four-wheel drive - Maximum towing capacity of 9,750 pounds Other Features: US NEWS - Alarm - Back-Up Camera - Cruise Control - Adaptive Cruise Control - Heads-Up Display - Vehicle Anti-Theft System - Fog Lamps - Auto-Off Headlights These features make the Grand Wagoneer Series iii Obsidian a powerful and luxurious SUV with a range of premium amenities and capabilities. It offers a comfortable and stylish interior, advanced technology features, and a capable powertrain for both on-road and off-road adventures. Question: What is the towing capacity of The Jeep Grand Wagoneer Series iii Obsidian. What is the difference in towing capacity between the Grand Wagoneer Series III Obsidian and other models in the Grand Wagoneer lineup Answer The Grand Wagoneer Series iii Obsidian has a maximum towing capacity of 9,750 pounds. This is made possible by its powerful 3.0-liter, twin-turbocharged inline-six engine that produces 471 horsepower and 455 lb-ft of torque. Additionally, the Obsidian 4x4 comes with an eight-speed automatic transmission and four-wheel drive. With this towing capacity, the Grand Wagoneer Series III Obsidian is capable of towing heavy loads, making it a great option for those who need to haul trailers or other equipment. Edmunds & Jeep.com The Grand Wagoneer Series III Obsidian has a maximum towing capacity of 9,750 pounds. This is the same towing capacity as the Grand Wagoneer L, which also has a maximum towing capacity of 9,750 pounds. However, the Wagoneer L has a slightly higher maximum towing capacity of 10,000 pounds with rear-wheel drive. It is important to note that the towing capacity may vary depending on the drivetrain and other factors, so it is always best to consult the vehicle's specifications for accurate information. CarBuzz & MotorTrend The Grand Wagoneer Series III Obsidian has a maximum towing capacity of 9,750 pounds. This is a significant towing capacity for an SUV, and it is comparable to the towing capacity of some pickup trucks. For example, the Ram 1500-series underpinnings give the Grand Wagoneer Series III Obsidian a 9,750-pound tow capacity, which is a number unheard of for an SUV since the Ford Excursion. The Grand Wagoneer Series III Obsidian's towing capacity is also comparable to that of the Chevy Suburban, which has a towing capacity of 8,300 pounds. However, the Grand Wagoneer L has a slightly higher maximum towing capacity of 10,000 pounds with rear-wheel drive. Overall, the Grand Wagoneer Series III Obsidian's towing capacity is impressive and comparable to that of some pickup trucks. It is a great option for those who need to tow heavy loads, and it is worth considering for those who are in the market for a luxury SUV with towing capabilities, Edmunds & UtvDriver

People Also Read: Q7 vs Q8 Read the full article
0 notes
Text
How to inline row editing using Laravel 9
How to inline row editing using Laravel 9
We will learn how to inline row editing with Laravel in this tutorial. This article will show you a straightforward example of a Laravel ajax inline edit row so that you can learn about Laravel x-editable. You can use this example with Laravel 8 after I demonstrate how to create a straightforward example of inline editing for a table in a Laravel application. We’ll show you a list of pupils, and…

View On WordPress
0 notes
Text
How to inline row editing using Laravel 9
New Post has been published on https://www.codesolutionstuff.com/how-to-inline-row-editing-using-laravel/
How to inline row editing using Laravel 9

We will learn how to inline row editing with Laravel in this tutorial. This article will show you a straightforward example of a Laravel ajax inline edit row so that you can learn about Laravel x-editable. You can use this example with Laravel 8 after I demonstrate how to create a straightforward
0 notes
Text
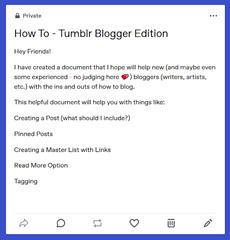
How To - Tumblr Blogger Edition
Hey Friends!
I have put a little something together that I hope will help new (and maybe even some experienced - no judging here 💕) bloggers (writers, artists, etc.) with the ins and outs of how to blog.
This post will help you with things like:
Creating a Post (what should I include?)
Pinned Posts
Creating a Master List with Links
Read More Option
Tagging
Reblogs, only Please!
How to - Tumblr blogger edition
Pinned post
Create Post

Click Post Now
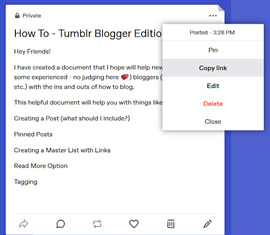
Go to the ellipses (three dots) at the top right corner of the newly posted work, and click on it.
Click on Pin

Congratulations! You’ve just pinned your post!
Creating a Master List with links
Create Post
Click Post Now
Go to the ellipses (three dots) at the top right corner of the newly posted work, and click on it.
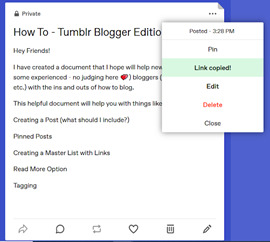
Click copy link
Once it’s been clicked, it will say Link Copied! and turn green.
Go to your pinned post.
Scroll down to the bottom and click the little pencil 🖉 to edit the post
Create a name (Usually the title of your work) and highlight the name.
Automatically, a little “bar of options” will pop up to let you fix or change the font of your text.
The second to last bubble in this “bar of options” is to create the link🔗. It says *Inline Link*
Click the button, and another bar will pop up.
Paste your copied link from earlier into this line and click Done.
Scroll back to the Bottom of your pinned post and click Save.
Congratulations! You’ve created a link to your work!
*Always click on your link to make sure it works and brings you to the piece you want to be linked*
Read More Option & Creating an Original Post
This is used for both courtesy and intrigue.
*This option allows the creator to hide NSFW work or lure the viewers in without giving too much away above the cut line. It’s also good if your post is super long, so it doesn’t clutter other’s dashboards - this is a highly desirable trait used by most Tumblr writers and artists.
Create Post
Title
Description of what is posted
Warnings/ Triggers
Pics or gifs, if desired
Credit to other contributing parties (if/when necessary)
You may want to add something to remind others that they should only Reblog your work.

Hit enter for a new line, and a row of little icons will pop up, including:
Camera, video, GIF, Audio, Link, and ellipses (three dots)
Click on the ellipses (three dots). This is the “read more” option

Insert the rest of your post below the cut line. Include:
Your work
People you want to tag - example: @thelaundrybitch
A link to your Master List! - People want to read and see more of your work! (create this the same way you created links for your Master List, just do it backward - Copy the link from your Master List and insert the link on your work)

TAG TAG TAG - example: #Thanks for the tag
If you aren’t sure how to tag your work, check out work similar to yours and see how this creator tagged their work.
Or ask! We are all willing to help 💕
Enjoying my work? Find my Master list HERE
If you aren’t on this list, please let me know if you want me to tag you in my other work or if you prefer me to not tag you 😘
#how to#tumblr blogger#tumblr blogger help#Master List help#Read more Help#creating a post#pinned posts#Read More Option#Tagging#Fanfic writers#fanfic writing#fan art#Blogger ettiquette#Creating a Master List with Links#thelaundrybitch
187 notes
·
View notes
Text
Tumblr is wild because of how little control someone has over a post once it is made. Its most evident in the experience of encountering a block of text with a row of people debunking it, ridiculing the poster, and demanding others do the same. Inline timestamps still don't exist. The poster can't go back and edit the base post and say "hey, sorry. I made a mistake." On twitter you could delete a tweet. You can re-upload a YouTube video. With time it'll fade away, and while sometimes a person is forced to reckon with something from 8 years ago they never addressed, the nature of those feeds means the content goes away eventually.
On tumblr, the error and the outrage are made artifacts, that moment is a bubble of atemporality bursting on your dashboard. The emotional reaction you have to it fresh even if the post is 10 years old. The poster may well have apologized, made earnest motions towards amends, totally changed their stance, but that is difficult to find. They might not even have the same username anymore. They may no longer even be on tumblr. But that moment is calcified, passed around, to be relitigated again and again, to be fact checked without end, to be picked over until the notes counter breaks and beyond.
504 notes
·
View notes
Text
What Is Pages App For Mac

Pages For Mac
Apple Pages Online
What Is Pages App For Macbook Pro
Pages App For Mac
Documents, spreadsheets, and presentations. With everybody’s best thinking.
LibreOffice is a powerful office suite – its clean interface and feature-rich tools help you. Apple’s iWork apps (Pages, Keynote, Numbers) are now available for free to any Mac or iOS user, so I thought it might be good to document some of the lesser known talents of Apple’s now-free. Apple Pages word processor. I have used every version of Pages, the Apple word processor app since Apple released it in 2009. The iWork 09 version worked perfectly. But at that time, it cost $79.00 for the suite of Pages, Numbers, and Keynote. Later, in 2014, Apple released a new version. Apple pages for windows free download - Apple Pages, Pages, Apple Safari, and many more programs. Word processor & page layout app. Paid Editors' rating. Publisher: Apple Downloads. Downloading apps requires an Apple ID. Pages for Mac, Numbers for Mac, and Keynote for Mac are available on the Mac App Store. MacOS Catalina or later required. Some features may require internet access; additional fees and terms may apply.
Pages, Numbers, and Keynote are the best ways to create amazing work. Templates and design tools make it easy to get started. You can even add illustrations and notations using Apple Pencil on your iPad. And with real‑time collaboration, your team can work together, whether they’re on Mac, iPad, or iPhone, or using a PC.
Pages
Amazing. In so many words.
Pages lets you effortlessly create sensational-looking documents. Choose a template, then use the powerful tools to add a picture, movie, shape, or chart. It’s never been easier to create a beautiful read.
Numbers
Spreadsheets that are bottom‑line brilliant.
A spreadsheet doesn’t have to look like a ledger. That’s why Numbers starts you off with a blank canvas instead of an endless grid. It’s easy to add dramatic charts, tables, images, and Smart Categories that paint a revealing picture of your data.
Keynote
Presentation perfect.
With Keynote, it’s easy to create and deliver stunning presentations. Powerful graphics tools let you design beautiful text and spectacular slides with cinematic transitions that bring your ideas to life.
New report templates
Select from new report templates to help you get started.
And more
Enhance your documents with a variety of new, editable shapes.
Get complete step-by-step instructions and information on all the features in Pages for Mac.
New in Pages 10.1 for Mac
Play YouTube and Vimeo videos right in your documents.* Learn more
Easily add captions and titles to images, videos, shapes, and other objects. Learn more
Create more flexible formulas using new functions.
Import an iBooks Author book to work on it in Pages. Learn more
* This feature may not be available in all countries or regions.
New in Pages 10.0 for Mac
Pages For Mac
Select from a variety of gorgeous new templates to help you get started.
Add a Pages document to a shared iCloud Drive folder to automatically start collaborating. Requires macOS 10.15.4. Learn more
Add a drop cap to make a paragraph stand out with a large, decorative first letter. Learn more
Apply a color, gradient, or image to the background of any document. Learn more
Easily access your recently used templates in a redesigned template chooser.
Print or export a PDF of your document with comments included. Learn more
Edit shared documents while offline and your changes will upload when you’re back online. Learn more
Enhance your documents with a variety of new, editable shapes.
New in Pages 8.2 for Mac
Set the default font and font size used for all new documents created from basic templates. Learn more
Jump to a specific page in your document using a new menu command.
Easily add HEVC-formatted movies to documents, enabling reduced file size while preserving visual quality. Learn more
Add accessibility descriptions to audio, video, and drawings. Learn more
Improved accessibility of exported PDFs.
New in Pages 8.1 for Mac
Style your text by filling it with gradients or images, or by applying new outline styles. Learn more
Copy and paste pages or sections between documents. Learn more
Create links from text to other pages in a page layout document. Learn more
Place images, shapes, and equations inline in text boxes so they move with text. Learn more
Using face detection, subjects in photos are intelligently positioned in placeholders and objects.
Reapply a master page so text and media placeholders return to their default style and position. Learn more
Create books using new templates for novels (available in English only).
New in Pages 8.0 for Mac
Use the new table of contents view to easily navigate your document or book. Learn more
Automatically sync custom shapes to all your devices using iCloud. Learn more
Automatically sync custom templates to all your devices using iCloud. Learn more
Add alignment guides to master pages to help with layout.
Improved performance while collaborating on documents.
Insert tables of contents and edit grouped objects while collaborating.
In Chinese, Japanese, and Korean languages, you can now type vertically in your entire document or in an individual text box. Learn more

New in Pages 7.3 for Mac
Offer your books for download or purchase on Apple Books. Learn more
New in Pages 7.2 for Mac
Use Dark Mode to give Pages a dramatic dark look. Requires macOS Mojave. Learn more
Easily record, edit, and play audio right on a page. Learn more
Support for Continuity Camera allows you to take a photo or scan a document with your iPhone or iPad and it automatically appears in your document on your Mac. Requires macOS Mojave and iOS 12. Learn more
Enhance your documents with a variety of new editable shapes.
Performance and stability improvements.
New in Pages 7.1 for Mac
Track text changes in shapes and text boxes.
Add colors and images to backgrounds in page layout documents.
Give charts a new look with rounded corners on columns and bars.
Add mathematical equations to page layout documents using LaTeX or MathML notation. Learn more
Enhance your documents with a variety of new editable shapes.
Improved support for Arabic and Hebrew. Learn more
Apple Pages Online
New in Pages 7.0 for Mac
Use new book templates to create interactive EPUB books. Learn more
View two pages side-by-side, and format them as double-page spreads. Learn more
Collaborate in real time on documents stored in Box. Requires macOS High Sierra. Learn more
Add an image gallery to view a collection of photos on the same page.
Create master pages to keep the design consistent across your page layout document.
Use donut charts to visualize data in an engaging new way.
Enhance your documents with a variety of new editable shapes.
Additional options for reducing the file size of documents.
New option to automatically format fractions as you type.
New in Pages 6.3 for Mac
Improved PDF export lets you view a document's table of contents in the sidebar in Preview and other PDF viewer apps.
Drag and drop rows in tables that span multiple pages. Learn more
Performance and stability improvements
New in Pages 6.2 for Mac
Enhance your documents using a library of over 500 professionally drawn shapes. Learn more
Reply to comments and join threaded conversations. Learn more
Add linked text boxes so text easily flows from one place to another. Learn more
New auto-correction and text replacement options save time while typing. Learn more
Export documents as fixed layout ePub books. Learn more
Change margins, headers, footers and paper size while collaborating. Learn more
Improved support for Hebrew and Arabic languages.
The Stock and Currency functions now return data from the previous market day’s close. Learn more
New in Pages 6.1 for Mac
Add bookmarks to easily link from one part of your document to another. Learn more
Add elegant mathematical equations using LaTeX or MathML notation. Learn more
Quickly open password-protected documents using Touch ID on the new MacBook Pro with Touch Bar. Learn more
Easily replace fonts throughout an entire document.
Import and export documents in Rich Text Format (RTF). Learn more
New leader lines make pie charts easier to read.
New stock and currency functions provide up-to-date securities data in tables.
Customize dates, times, and currencies for your language or region.
New in Pages 6.0.5 for Mac
Support for Touch Bar on the new MacBook Pro lets you easily edit text, shapes, tables and charts.
Stability and performance improvements.
What Is Pages App For Macbook Pro
New in Pages 6.0 for Mac
Pages App For Mac
Real-time collaboration (feature in beta)
Edit a document with others at the same time in Pages on Mac, iPad, iPhone, and iCloud.com.
Share your document publicly or with specific people.
See who else is in a document.
See participants’ cursors as they’re editing.
Open and edit Pages ’05 documents. Learn more
Use tabs to work with multiple documents in one window.
Wide color gamut image support.
What Is Pages App For Mac
2 notes
·
View notes
Text
Data Table in Lightning Web Component | Salesforce Lightning Web Component |BISP Trainings

How to Create Data Table in Lightning Web Component? | Data Table in Lightning Web Component | Our experts have prepared various informative learning tutorials on Salesforce lightning Web Component. In this series this is next video in this video expert explains how we can create Data table in Lightning web component. This is the most important topic and creation of data table in salesforce is very important task. Lightning-data table component displays tabular data for list of records. lightning-data table component supports inline editing, which enables you to update a field value without navigating to the record. We can display each column based on the data type. Data Tables in Lightning Web Components is one of the popular base components that you will reach out to whenever you want to display list of records. Data Tables are very popular in Aura Components and in Salesforce Classic too, with the only difference that they are referred to as Page Block Tables. The reason why it is so easy to work with and easy to configure is, we don't have to deal with a ton of options. Our experts have created a Lightning web component data table which has row action when you click on it will open modal box with ability to select pick list value, adding data table column, type Attributes and each column width can be adjusted from back end apex wrapper. We provide expert online salesforce training,salesforce lightning training, lightning web component, salesforce developer certification,cloud computing,certification guidance,YouTube Video,Live Project,support,BISP
1 note
·
View note
Text
APEX 5.1

Oracle APEX 5.1: Building Modern Web Applications with Ease
Oracle Application Express (APEX) is a robust low-code development environment designed to help developers quickly build sophisticated, data-driven web applications. Version 5.1 further refined the APEX experience, introducing exciting features and improvements. Let’s dive into what makes APEX 5.1 stand out.
Exciting Capabilities Introduced in APEX 5.1
Interactive Grids: This powerful new component revolutionizes your interaction with tabular data. It provides inline editing, column sorting, filtering, row actions, and much more—directly within your web application.
Universal Theme: Thanks to its new Universal Theme, APEX 5.1 features a modern, responsive design. Your applications seamlessly adapt to different screen sizes, ensuring an optimal user experience across desktop, tablet, and mobile devices.
Faceted Search: This feature empowers users to refine search results more quickly. It allows intuitive filtering based on multiple criteria, providing a more guided browsing experience.
Enhanced Page Designer: The Page Designer interface received a significant revamp in version 5.1. This upgrade offers a more intuitive and streamlined approach to application development.
Packaged Applications: APEX 5.1 includes new and improved packaged applications. These productivity-focused apps serve as excellent starting points or can inspire your own custom creations.
Why Choose APEX 5.1?
Rapid Development: APEX’s low-code approach accelerates development time significantly compared to traditional programming frameworks. You work primarily with visual tools and wizards, reducing the need to write extensive code.
Built on Oracle Database: APEX runs natively within the Oracle Database. This tight integration leverages SQL and PL/SQL power while ensuring maximum performance, security, and scalability.
Cost-Effective: APEX is included in the Oracle Database license. This provides tremendous value, eliminating the need for additional middleware or costly development tools.
Highly Customizable: Although APEX streamlines development, it doesn’t restrict your creativity. You can easily tailor applications with custom code and integrate external JavaScript libraries.
Considerations
Database Dependency: APEX is built on the Oracle Database, so your application will be tied to this platform.
Learning Curve: While APEX simplifies development, some familiarity with database concepts, SQL, and PL/SQL is beneficial for making the most of the framework.
Conclusion
Oracle APEX 5.1 is a compelling choice for efficient web application development, primarily where your data resides in an Oracle Database. Its ease of use, rich features, and integration with Oracle technologies make it an attractive option for businesses of all sizes.
youtube
You can find more information about Oracle Apex in this Oracle Apex Link
Conclusion:
Unogeeks is the No.1 IT Training Institute for Oracle Apex Training. Anyone Disagree? Please drop in a comment
You can check out our other latest blogs on Oracle Apex here – Oarcle Apex Blogs
You can check out our Best In Class Oracle Apex Details here – Oracle Apex Training
Follow & Connect with us:
———————————-
For Training inquiries:
Call/Whatsapp: +91 73960 33555
Mail us at: [email protected]
Our Website ➜ https://unogeeks.com
Follow us:
Instagram: https://www.instagram.com/unogeeks
Facebook: https://www.facebook.com/UnogeeksSoftwareTrainingInstitute
Twitter: https://twitter.com/unogeeks
0 notes
Text
Best WordPress themes of 2020: paid, free, and for business
The WordPress platform is one of the simplest ways to create colorful and well laid out webpages. Setup is usually performed with a few mouse clicks, so no coding knowledge is required. free WooCommerce theme
The platform supports thousands of various designs known as themes, some of which are suited to specific users such as small businesses, whilst others have a more general appeal.
Many Wordpress themes are designed for blogs, but there are more specialist ones, such as for art and photography portfolios. There are also premium Wordpress themes available for those who want to invest extra in their website, and there are also ecommerce themes for business users.
When starting out you may feel overwhelmed by the choices available, especially if you’re not sure if a theme is worth buying. Also, do check that any theme you do consider will work properly with any Wordpress plugins you have also installed.
In this guide, you’ll discover five of our very favorite free and paid WordPress themes. Whether you’re a freelancer on a tight budget or an established business, rest assured there’s a theme for you.
Hestia
X
Allegiant
Sydney
Uncode
Foodie Pro
Shopkeeper
Hestia (Image credit: Hestia) 1. Hestia
The simplest of the best Wordpress themes
Free and Premium tier
One-click install
Integrations
Hestia is the perfect theme for those with small businesses, startups, online agencies and firms due to its multi-purpose functionality. Users do not have to pay to download this theme. Installation and setup is designed to be user friendly. free WooCommerce theme
This theme is best suited to users who want to setup an ecommerce platform. Hestia integrates with WooCommerce, allowing users access to beautifully designed product listings. There is an easy to use drag and drop feature suitable.
This theme comes with custom background settings which aid in adding photos to your site and making it your own. It has a multi-purpose one page design, a widget designed footer and a blog or news section.
It integrates with Travel Map, Photo Gallery, Flat Parallax Slider and Elementor Page Builder. Hestia is responsive and uses Material Kit for design. free WooCommerce theme
As with most WordPress themes, there is a demo for users to sample before downloading.
X (Image credit: Themeforest) 2. X
The best Wordpress themes for features
Highly customizable
Integrates well with WordPress
Variety of designs
X is a paid WordPress theme suitable for all types of websites.
The theme comes with four categories of built-in demos. Each of these themes cover a wide variety of potential projects. This means that no matter what you have in mind, X more than likely has a design suited to your needs.
Cornerstone is included with X. This is one of the most popular WordPress web page builders. The drag and drop feature is easy to use. Users are able to see exactly what their page will look like live as they are building. This enables users to change and edit while building their site. free WooCommerce theme
There are a huge number of customization options, with which users can build a unique webpage. It's also constantly updated and you get features like the custom font or inline editing. In the early 2019, X introduced Dynamic Content which helps a lot when building out content throughout your site.
X comes with a feature called ‘the customizer’. This is a handy tool as many premium themes come with their own theme options page that is not entirely compatible with WordPress. ‘The Customizer’ is highly intuitive. It integrates seamlessly with WordPress. It will help you to customize the look and feel of your website.
The regular license for X is $29 which includes future updates and 6 months customer support. Users can opt to extend support to 12-months for an additional $6.38.
Allegiant (Image credit: Wordpress) 3. Allegiant
The most customizable Wordpress theme
Free
Highly customizable
Slight learning curve
Allegiant is a highly customizable WordPress theme that is most suited for small businesses that are just starting out. free WooCommerce theme
The theme itself is simple and well laid out. Across the top there is a large header to highlight your most popular services or products. The slides on the homepage can be displayed in any order.
The theme offers several feature blocks that can be easily inserted onto your page with details about your business team or your past endeavors amongst others. These blocks come with the theme’s plugin ‘CPO Content Types’. The plugin is free and installs very quickly.
These pre-built blocks also come with testimonial section. It is very easy to copy and paste information into the blocks.
Allegiant integrates with other free popular WordPress themes such as WooCommerce, Yoast SEO, WPML and Contact Form 7.
It’s also free to download from the WordPress website.
Some online commentators mention that while the theme is customizable it is not easy to figure out how to do so. They don’t recommend Allegiant for newer users.
Sydney (Image credit: Athemes) 4. Sydney
The best Wordpress theme for freelancers
Free
Huge variety of fonts
Feature rich
Sydney works well for freelancers and companies who want to create a strong online presence. free WooCommerce theme
It is highly customizable with many options to choose from such as Google Fonts and logo uploads. The theme has more than 600 Google fonts to choose from.
For users who want to show off, there is a full screen promotional banner that can be edited to suit your needs.
The custom elementor blocks can be designed as you see fit and to suit your promotional needs. Sydney can also display social media icons at the bottom of your page.
The theme is translation ready and provides the necessary tools for a smooth translation process.
Users have access to full color control, sticky navigation, header image and a full screen slider. Sydney also offers Parallax background affects. Users can add this to any row in the theme layout. free WooCommerce theme
The theme is free to download, and costs $59 for a Pro licence.
Uncode (Image credit: Themeforest) 5. Uncode
The best multi-purpose Wordpress theme
Multi-purpose theme
Fully adaptive
Variety of premium plugins
Uncode is a multi-purpose theme suitable for most users.
The theme offers users a huge variety of website demos. These include classic, portfolio, blog and ecommerce layouts. free WooCommerce theme
Uncode’s images are fully adaptive so that they adjust automatically to whatever screen size they are being viewed on.
Users can edit their demos through the WPBakery Page Builder Plugin. They can also access to the handy drag and drop content editor. Uncode is compatible with most third-party plugins.
The themes large media library makes it easier for users to embed any type of media to your WordPress site.
Uncode has over 6 different menu types with advanced options. These include top right, justify, left, center, overlay, offcanvas and lateral.
The theme is WPML certified and offers RTL (Right to Left) support. The premium themes included are VC Page Builder, VC Clipboard, VC Particles, LayerSlider, Slider Revolution and iLightBox. In the recent updates, new features are available like animated headlines, highlighting effects and frontend editor, among other things.
You can purchase for $59 and includes future updates and 6 months support. If you want to extend support to 12 months, an additional $17.63 is needed.
Foodie Pro (Image credit: Studiopress) 6. Foodie Pro
The best Wordpress theme for food websites
Detailed tutorials
Uses Genesis Framework
Expensive
Foodie Pro helps users to create a beautiful blog based around all sorts of culinary delights.
It is created by the Genesis Framework. This means your website will have a solid combination of this Framework along with WordPress. The theme comes with a huge amount of typography and color options. free WooCommerce theme
Users can build their site using up to 3 homepage and 5 site wide widget areas. These can be customized to fit around your brand.
The theme allows users to upload their own logo with one click. There is also full support for text-based logos.
Foodie Pro’s ‘Theme Customizer’ allows users to customize the theme’s settings, colors and backgrounds images. free WooCommerce theme
The ‘Foodie Pro Theme’ can be purchased for $129.95 for one year. This includes the Genesis Framework, Foodie Pro Theme, instant access, unlimited updates, supports, sites and access to detailed tutorials.
If this is not enough, users can choose the ‘Genesis Pro’ for $360 (£279.5). This includes all the ‘Foodie Pro Theme’ has to offer plus access to every theme the company makes including future themes.
Shopkeeper (Image credit: Themeforest) 7. Shopkeeper
The best Wordpress theme for ecommerce
Highly customizable
WooCommerce compatible
Learning curve for new users
Shopkeeper is a user-friendly WordPress e-commerce platform. The homepage consists mainly of one large slider, designed to catch the eye of any potential clients. This is part of the Slider Revolution plugin which is included. Various optional plugins like "Shopkeeper Portfolio Addon" can also be installed.
The theme integrates completely with WooCommerce, and translation is supported with the WPML plugin. Shopkeeper is Retina-ready and fully responsive, making it perfect to view on both tablets and smartphones as well as your desktop computer.
The theme is easily customizable. Users do not need knowledge of complex codes in order to use it. There are a huge array of pre-built layouts to suit your needs, but failing this, users can create their own layout from scratch.
Users can also upload their own logo, change fonts and colors. Visual Slider and Revolution Slider plugins are included with the Shopkeeper theme; these cost around $26 (£19.5) each. Shopkeeper itself sells at $59 for a regular license. Users can upgrade to 12-months support for a further $17.63.
Some online commentators have noted that the huge amount of customizable settings contained within Shopkeeper can be overwhelming for newer users.
1 note
·
View note
Text
Hello, all. It has been a rough pandemic.
As you may have figured, since I am in the performing arts, I have been completely out of work since this shitshow began. The earliest venues will open up here in MA is September, which is not helpful for me, because I need to be out of my current place by 8/31. No one will rent to me on my Patreon income, so I've been trying to figure out how to supplement that with other online work.
My first thought, frankly, was camming. I'm attractive and I know that, and I don't care about being naked in "public". I have a lot of opinions on the legitimacy and legalization of sex work, but making a statement would be a convenient bonus; I'd be in it for the tips. As the appliance menagerie on the Flintstones used to say, "Eh. It's a living."
The best camera I currently have is attached to the slightly-less ancient laptop. You know, the one with the broken hinge that won't hold the screen up on the right. Only the wifi on that computer has quit working. The onboard chip was always kind of flaky, but for some reason it has chosen now to deteriorate to the point where it no longer acknowledges a router on the other side of the goddamn wall. Shooting in the living room with an ethernet cable is not an option, because another housemate is already doing that.
I bought a dual-band USB wifi adapter with antenna. It's a Realtek chip -- not gold-plated, but also not total junk. I specifically checked to make sure it worked with Ubuntu Bionic before I ordered. I have now installed three separate sets of drivers in three completely different ways, read everything ever written about this on AskUbuntu, and still the computer refuses to acknowledge its existence. Not even if I blacklist the onboard chip to keep it from falling back into previous bad habits.
The other elderly laptop (with the working wifi) has a cam that tops out at 640 x 480, which I suppose might squeak by as a tiny facecam on Twitch, or for tutoring where no one cares about pixelization. The microphone, however, is crap. It's a tinny omni on the screen bezel that likes room noise more than my voice. I don't have an external microphone, and there's no onboard Bluetooth for my wireless headset. So I bought a USB Bluetooth adapter, which this computer is ignoring as hard as the other one is the wifi dongle. I have a wired headset with a mic, but because this computer is probably mere months too old to know what to do with an inline mic on the same jack as the output signal, it doesn't register at all.
The camera on my phone is potato quality, because that is honestly about how much the phone cost. Ditto the refurb Kindle. Neither is smart enough to keep up with streaming video, which I found out when I tried to do a video rehearsal for something months ago.
I have no place to do any kind of professional non-entertainment streaming work (e.g., tutoring) with my terrible equipment in any event. I don't own a desk. If a free desk appeared on my doorstep tomorrow, I would have nowhere to put it. My bedroom is small enough to contravene the Geneva Convention requirements for POW cells and I'm basically stuck in here, for reasons of both air conditioning and not having to interact with a house full of people who very much want me gone.
What I do have is a set of working emulators and some free video editing software, so I decided to take a stab at a subtitled Let's Play. I can certainly ramble on for 30 or so hours of Final Fantasy II. At the very least it'll give me something scheduled to do. So I pulled everything out and set it up, only to find that my controller was "pining for the fjords" -- no lights, no acknowledgement from RetroArch, no response to any button presses.
...
...okay, well, at least we're down to a level of equipment I can afford to replace. So I am waiting for the mail carrier to bring me another $10 gamepad, whilst stuck in bureaucratic hell. I'm down to emergency public assistance, which keeps asking me to send them random documents, inconveniently one at a time. Even when I can submit them online I'm required to wait a minimum of 2-3 business days before a human can look at them. I'm trying to not be mad -- they are clearly horribly overworked -- but it also leaves me with a lot of time to do nothing but busy-wait. They've finally decided I'm destitute enough for food stamps, so now I have to sit on my hands until the card arrives in the mail.
The chronic, crushing lack of resources is not helped by (or helping) the fact that I'm just not functioning very well. I was already on the edge of disintegration when the lockdown orders hit anyway; I was taking every piece of work I could find in an effort to scrape together enough for first/last/deposit on a new apartment, and honestly that's more than I can handle. I can consistently get to about 20 hours of "stuff that can't be done while in bed, wearing pajamas" per week, with occasional spikes up to about 30, before I start losing the ability to take care of myself. I skip showers, let my living space become a complete disaster area, and go to bed without dinner because the whole process of choosing something to eat, preparing it, eating it, and cleaning up after myself is so overwhelming that I just burst into tears and don't do it. I fed the rats twice a day and cleaned their cage once or twice a week, but couldn't manage to do the same for myself.
It's difficult to explain to people the state of being physically and mentally exhausted without also being sweaty and shaky from muscle fatigue. Perhaps the single most salient example I can give is lying in bed at night and realizing I kind of vaguely needed to pee. Not like urgently -- just enough that I knew if I didn't, I'd wake up the next day with an uncomfortably full bladder. Then just lying there anyway, not because I thought suffering was noble or I deserved it or anything idiotic like that, but just because taking care of it would involve standing up, walking into another room, and initiating a new task, and I did not have the capacity to do any of those things.
If you suggest I start making a to-do list, I will sit down right now and invent a brand new Blunt Object Transfer Protocol (botp://) expressly for the purpose of punching you, personally, in the face over the goddamn internet. I will even credit you in the patent application. I will not share the licensing profits, which judging from social media right now, would be approximately all of the money on the face of the Earth. I do not need "life hacks".
What I really need is a case worker, or possibly a babysitter, or just to have shown up at the ER about two months ago, because that is the only way I have ever found to get people to pay attention when I ask for help. Otherwise I get triaged out of sight and out of mind -- they ask if I'm suicidal, I tell them no, they tell me 'okay, here's a prescription for six Xanax and a packet of resources, go home and fix it yourself'. I'm just like, you sons of bitches, do you think I don't know how to Google things? If I could fix this on my own, I wouldn't be talking to you. Except I can't right now, because plague.
Everyone wants to fob me off on someone else. I was referred to an SSDI attorney by a friend, because frankly that's where I'm at right now. I wrote to them, specifically mentioning his name and the associate who helped him, and explained that I was basically a vegetable and I needed help applying for disability. I'm a college-educated suburban white girl, who grew up hearing her parents make rude jokes about welfare queens -- I have no idea how any of this works and I'm so broken I kept losing my place in a blanket whose pattern was literally "knit-purl-knit-purl to end of row; turn work over; repeat". Their response was "Sounds like you need some help applying for SSDI/SSI disability. Here's the website for the Boston Bar Association, good luck!" Crisis lines of both the psychiatric and financial varieties keep directing me to one of two national clearinghouse sites for social support services, both of which direct me to each other, because neither has any programs in my area.
I am trying really, really hard not to resent the ever-loving fuck out of anyone who has any sort of support system right now. One housemate has almost the exact same list of medical problems that I do, and is also completely out of work right now. She is married to the one who has a grown-up salaried WFH IT job, and will never have to worry about having a roof over her head or food in the cabinets. The single housemate has supportive family literally a five minute walk down the street; if she ever gets her feet kicked out from under her, she can stay with them temporarily while she scrambles back up. Another friend yote out to California right before lockdown to stay with his family. A local offered to help me with paperwork, then ghosted me intermittently before explaining that he was having a hard time himself right now and barely had the capacity for his own life. I have an elderly rat, no more savings, and no options.
I don't even know how I'm going to move the little I own. How do you even ask people to do that in the middle of a pandemic? If I don't have the money to move, I definitely don't have the money for a moving company, and I'm envisioning all of my community-minded friends pursing their lips in judgement and declining because like all the good people they are diligently social distancing.
I have also discovered, while hauling an empty suitcase out to Watertown and a full one back home again, that I do not cope well with face masks. It's fine if I'm not doing much, especially if I'm in a climate-controlled space like a store or the T, but as soon as I exert myself at all, I see spots. And no, it is not a matter of "just get used to it"; I have tested this by trying to wear a mask during my home workouts. It is just stuffy enough under there, and there is just enough reduction in air flow, that the world keeps going all film-grainy and dark on the sides, which I know from experience is the first step on a very short path to the Magical Land of Syncope. I had to stop during the outdoor trek and sit on the suitcase about twice a block through the commercial district, where it stayed on because there were people. This was when it was 72 whole degrees out (and the AC is generally on 74°F inside) which doesn't bode well for moving my heavy shit around in late August.
I'm normally good at catching things at the weird-vision stage, although enough random strangers and T employees have asked me if I'm okay that I have to assume I look as ill as I feel at that point. And I have an absolutely tragic talent for talking people out of calling emergency services when I do actually keel over, but everyone is so health-panicked that I don't think it would work right now. I know what's happened and why, but I can't exactly communicate that to bystanders when I'm unconscious. As nice as EMS is, I don't feel like waking up to a round of Twenty Questions ("How many fingers am I holding up? Who's the President? Do you have a seizure disorder?"). So I just don't go out.
Alison over at Ask A Manager got a question about this the other day that suggests this is considered legitimate can't-(always-)wear-a-mask territory, and I am able to wear a mask where required in MA, which is indoors/during interactions with other people when it's actually useful, so I don't have any qualms on the scientific or legal front. I have just never been a good judge of how much potential peril/damage it's "reasonable" to put up with, and I don't have the capacity to explain myself over and over again a million times a day.
I'm fucking tired. I'm tired of covid, I'm tired of living in a big glitzy continent-spanning banana republic, I'm tired of anxiety, I'm tired of other people carping at me to do things I can't in order to fix their anxiety for them, I'm tired of not having the space to dance, I'm tired of asking for help before things fall apart and being told 'well, come back when it is an emergency', and most of all I'm tired of this cycle where I tell myself "I'm going to stop being lazy! I'm going to put on my big-girl pants and wake up early and work 40 hours a week and support myself like an adult!" and then fail at it again because I just do not have the capacity to do that. I do not know how to make the system understand that I need some kind of support right now.
Sorry for yet another depressing update, but that's where I am right now.
from Blogger https://ift.tt/2YPv8Xu via IFTTT -------------------- Enjoy my writing? Consider becoming a Patron, subscribing via Kindle, or just toss a little something in my tip jar. Thanks!
2 notes
·
View notes
Text
Case Study- Inline Editing in Lightning Data Table | Salesforce Lightning Web Component |
In this post we are seeing that how to perform Inline Editing in salesforce lightning components. Also, showing error alert message, if any record dependent to other records. This kind of functionality used to perform multiple rows editing at one click of button. We are covering each and every concepts of web components in our salesforce lightning web components training. In this scenario our expert explaining First, we need to select pencil shape icon on the cell as soon as we can click on the icon cell converts into editable textbox, then we need to modify the data of newly converted textbox, then click on ‘SAVE’ button. In this way we are able to perform inline editing on lightning data table.
If you are working on same technology you might aware of data table and how to create in lightning web components Data Table in lightning web components bcuz this is very new and might you were not aware of or even you haven’t heard off. Lightning web components are custom HTML elements built using HTML and modern JavaScript. Lightning web components and Aura components can coexist and interoperate on a page. Lightning Web Components is lightweight and delivers exceptional performance. Most of the code you write is standard JavaScript and HTML.
#inline editing lightning web components#Inline editing task salesforce lwc#Java script controller LWC#salesforce aura training classes#salesforce LWC training online
1 note
·
View note
Photo

Show an Event Calendar With a Free WordPress Calendar Plugin
Many businesses need to share event calendars with customers. For example, a restaurant can use an event calendar to advertise special musical events, or holiday menus. Similarly, schools can use event calendars on their websites to let students and teachers know about any upcoming activities in school related to sports, exams or other events.
Event calendar plugins are helpful for individuals as well if they want to keep track of different things they are supposed to do. For example, you could use an event calendar plugins to mark important meetings and events like birthdays of friends and family.
Choose the Best WordPress Event Calendar Plugins
Looking for the best WordPress event calendar plugins? This list has all the top event calendar plugins you need to consider.
Nona Blackman
28 Feb 2019
WordPress Plugins
Insert a Calendar Into WordPress With the Pro Event Calendar Plugin
Displaying a calendar on your website is a must for many business owners. The Pro Event Calendar plugin makes it easy to add an event calendar to your posts...
Daniel Strongin
24 Sep 2019
WordPress Plugins
20 Best WordPress Calendar Plugins and Widgets
Whether you need an event calendar plugin, a booking system with payments, or a Google Calendar widget, this list of plugins will have something to improve...
Esther Vaati
06 Sep 2019
WordPress
Guide to WordPress Event Calendar and Booking Plugins
WordPress calendar plugins let users make bookings, schedule events, pay for appointments, and more. If your website does any of these things, you need a...
Lorca Lokassa Sa
21 Sep 2019
WordPress
In this tutorial, you will learn how to use the free My Calendar WordPress event management plugin in order to create events. The plugin has a lot of amazing features that we will use in the tutorial.
What We'll Be Building
Our focus in this tutorial will be on creating a calendar that allows a company to mark all the events that they manage like parties, weddings, art exhibits etc. They will be able to see all the future and past events.
We will make the events color coded so that they are easy to identify. Users will be able to click on any specific event category and only see matched events in the calendar. Clicking on any event will show a pop-up with all the basic information about the event like its timing and location.
We will begin by installing the plugin. Then, we will change some settings to modify the input and output. After that, we will create some event categories, add some event locations and finally add the events to our calendar.
Also, there is a good chance that you will want to make some changes to the appearance of the event calendar so that it blends in with the rest of your website. Therefore, we will add some of our own CSS rules in the last step to make some cosmetic changes in the calendar.
Creating an Event Calendar
Setting Things Up
The first step towards creating our event calendar would be installing the My Calendar plugin. Once you have installed and activated the plugin, go My Calendar > Settings in the admin dashboard. You will see a bunch of tabs there.
Click on General and then specify the ID for the page where you want the event calendar to appear. In our case, it is 118. This step is optional and the plugin will automatically create an event calendar page for you when you publish your first event. However, it is good know know how to show the event calendar on a specific page.
Whenever you create a new event with this plugin, you will have to fill out some details about the events. This could include many things like event location, short description etc Not all of these input fields are activated by default. Therefore, you should now head to the Input tab and check the fields that you want to appear, as in the image below.
You have probably noticed that there are a lot of buttons and dropdown menus on the event calendar page besides the calendar itself. The order in which these buttons are displayed is controlled by settings in the Output tab. You can drag the elements up and down to display them in a specific order. Just drag an element below the Hide row in order to prevent it from displaying.
It is possible to control what information is shown to users in the pop-up once they click on an event by toggling some checkboxes under Single Event Details.
Creating Event Categories
Now that we have set everything up, it is time to create actual content for our events calendar.
We will begin by adding some categories that will be used to mark different events. This plugin gives users the option to only see events from specific categories. Events can be filtered this way once they have been assigned different categories.
To add a new category to the calendar, simply go to My Calendar > Manage Categories and then specify a name and label color for the category. You can also choose to display an icon before the category by selecting one from the Category Icon dropdown.
Once you have added all the details for a category, click on the Add Category button to add the category to the event calendar.
Adding Event Locations
Any events that you organize will take place somewhere. The plugin does a great job when it comes to specifying locations of different events.
You can add a new location to the calendar plugin by going to My Calendar > Add New Location. The next page will contain a lot of input fields that ask for different details of the location. This includes the usual things like street address, city, postal code and country etc. You don't have to fill in all these values. Some of these details can be skipped.
Make sure that you have entered a name for the location at the top. This will help you easily identify these locations in the dropdown menu when creating events.
In this example, we will add a location for an art exhibit that is taking place in Kentucky, USA. The address is fictional but it will give you an idea about filling out your own details.
The plugin will give users a link to Google Maps with the address that you specified. This makes it easier for people to figure out exactly where the event is happening. Any locations that you add to the plugin can be edited by clicking on My Calendar > Manage Locations.
Adding Events
We can now start adding events to our events calendar. To add an event, simply go to My Calendar > Add New Event.
Now, fill out the title and description of the event. The title is displayed within the dates on the event calendar. The description will be displayed on the event description page when users click on the Read More link in the pop-up. Set the event category to Exhibit from the dropdown menu.
You can now specify a date and time for the event. There is a good chance that at least a few events that you add to the calendar will be recurring events. In this case, it would be very time consuming to add all the repeated events to the calendar one by one.
To make things easier for you, the My Calendar plugin gives you the option to specify the repetition pattern for an event. This means that you can specify how many times an event will repeat and the frequency with which it will repeat.
At the beginning of the tutorial, we checked the box to enable a short description input field for events. This allows us to provide a short summary of the event which will be displayed in the pop-up whenever a user clicks on the event in the calendar.
You can specify a location for the event at the bottom of the Add New Event page. Simply choose Art Exhibit (Kentucky) for this example. After that, click on the Publish button at the top or bottom of the page.
Change the Styling of the Event Calendar
After following all the steps in this tutorial, your event calendar will look like the image below. If its styling is different from the following image, simply go to My Calendar > Style Editor and then pick the twentyeighteen.css file from the dropdown in the sidebar as the primary stylesheet for the calendar. There are a bunch of other themes that you can apply to the calendar. Just pick one that you like the most. Some of them like inherit.css are meant to provide the minimum possible styling so that most of the style rules from your theme are automatically applied to the calendar.
The style editor page shows all the CSS rules from the selected file that are applied to the calendar. You can make all kinds of changes here and they will be reflected on the event calendar page.
For now, we will simply adjust the spacing and fonts that are applied to different elements like the table caption, header and category legend at the bottom. We will also add some of our own style rules to adjust the appearance of the calendar to our liking.
Here are all the rules that we add to our event calendar. Simply place them at the bottom of the style editor and the changes will be reflected on the event calendar page once you click on Save Changes button at the bottom.
.mc-main .my-calendar-header .no-icon, .mc-main .mc_bottomnav .no-icon { display: inline-block; /* width: 12px; */ width: 15px; height: 15px; vertical-align: middle; margin-right: .25em; border-radius: 12px; position: relative; top: -2px; border: 1px solid #fff; } .mc-main .my-calendar-header span, .mc-main .my-calendar-header a, .mc-main .mc_bottomnav span, .mc-main .mc_bottomnav a, .mc-main .my-calendar-header select, .mc-main .my-calendar-header input { color: #313233; color: var(--primary-dark); /* border: 1px solid #efefef; border: 1px solid var(--highlight-light); */ border-radius: 5px; padding: 4px 6px; font-size: 14px; /* font-family: Arial; */ background: #fff; background: var(--secondary-light); } .mc-main .my-calendar-header input:hover, .mc-main .my-calendar-header input:focus, .mc-main .my-calendar-header a:hover, .mc-main .mc_bottomnav a:hover, .mc-main .my-calendar-header a:focus, .mc-main .mc_bottomnav a:focus { background: black; } div.mc-print { margin-top: 2rem; } .mc_bottomnav.my-calendar-footer { margin-top: 5rem; } .mc-main button.close { top: 5px; left: 5px; } .mc-main .calendar-event .details, .mc-main .calendar-events { border: 5px solid #ececec; box-shadow: 0 0 20px #999; } .mc-main .mc-time .day { border-radius: 0; } .mc-main .mc-time .month { border-radius: 0; border-right: 1px solid #bbb; } .mc-main .my-calendar-header span, .mc-main .my-calendar-header a, .mc-main .mc_bottomnav span, .mc-main .mc_bottomnav a, .mc-main .my-calendar-header select, .mc-main .my-calendar-header input { color: #313233; color: var(--primary-dark); border-radius: 0px; padding: 4px 10px; font-size: 14px; background: #fff; background: var(--secondary-light); border-bottom: 1px solid black; } .mc-main th abbr, .mc-main .event-time abbr { border-bottom: none; text-decoration: none; font-family: 'Passion One'; font-weight: 400; font-size: 2.5rem; line-height: 1; } .mc-main caption, .mc-main.list .my-calendar-month, .mc-main .heading { font-size: 2.5rem; color: #666; color: var(--highlight-dark); text-align: right; margin: 0; font-family: 'Passion One'; text-transform: uppercase; } .mc-main .category-key li.current a { border: 1px solid #969696; background: #dadada; }
Now, go to the event calendar page and click on one of the events that you added. This should open a nice pop-up that shows all the basic details of the event like its timing, location and a short description.
Final Thoughts
In this tutorial, we learned how to use the My Calendar plugin in order to create a basic event calendar for our website. The plugin makes it really easy to create and add events along with a simple description.
However, there are still a couple of things missing from the plugin like widgets and a more advanced description page that provides extra features like payment options and the ability for users to add reviews about an event. The plugin is also a bit hard to style. If you want to use a more advanced event calendar plugin on your website, you should take a look at the WordPress event calendar plugins on CodeCanyon.
WordPress Plugins
Choose the Best WordPress Event Calendar Plugins
Nona Blackman
WordPress Plugins
Insert a Calendar Into WordPress With the Pro Event Calendar Plugin
Daniel Strongin
WordPress
20 Best WordPress Calendar Plugins and Widgets
Esther Vaati
WordPress
Guide to WordPress Event Calendar and Booking Plugins
Lorca Lokassa Sa
WordPress
8 Best WordPress Booking and Reservation Plugins
Lorca Lokassa Sa
WordPress
How to Create a Google Calendar Plugin for WordPress
Ashraff Hathibelagal
by Monty Shokeen via Envato Tuts+ Code https://ift.tt/2C23cok
1 note
·
View note
Text
Wscube Tech-Training program
Introduction :-wscube is a company in jodhpur that located in address First Floor, Laxmi Tower, Bhaskar Circle, Ratanada, Jodhpur, Rajasthan 342001.wscube tech one of leading web design and web development company in jodhpur ,india. wscube provide many services/ training for 100% job placement and live project.
About us:-:WsCube Tech was established in the year 2010 with an aim to become the fastest emerging Offshore Outsourcing Company which will aid its clientele to grow high with rapid pace. wscube give positive responsible result for the last five year.
Wscube work on same factor
1>We listen to you
2>we plan your work
3>we design creatively
4>we execute publish and maintain
Trainings:-
1>PHP Training:-For us our students is our top priority.this highly interactive course introduces you to fundamental programming concepts in PHP,one of the most popular languages in the world.It begins with a simple hello world program and proceeds on to cover common concepts such as conditional statements ,loop statements and logic in php.
Session 1:Introduction To PHP
Basic Knowledge of websites
Introduction of Dynamic Website
Introduction to PHP
Why and scope of php
XAMPP and WAMP Installation
Session 2:PHP programming Basi
syntax of php
Embedding PHP in HTML
Embedding HTML in PHP
Introduction to PHP variable
Understanding Data Types
using operators
Writing Statements and Comments
Using Conditional statements
If(), else if() and else if condition Statement
Switch() Statements
Using the while() Loop
Using the for() Loop
Session 3: PHP Functions
PHP Functions
Creating an Array
Modifying Array Elements
Processing Arrays with Loops
Grouping Form Selections with Arrays
Using Array Functions
Using Predefined PHP Functions
Creating User-Defined Functions
Session 4: PHP Advanced Concepts
Reading and Writing Files
Reading Data from a File
Managing Sessions and Using Session Variables
Creating a Session and Registering Session Variables
Destroying a Session
Storing Data in Cookies
Setting Cookies
Dealing with Dates and Times
Executing External Programs
Session 5: Introduction to Database - MySQL Databas
Understanding a Relational Database
Introduction to MySQL Database
Understanding Tables, Records and Fields
Understanding Primary and Foreign Keys
Understanding SQL and SQL Queries
Understanding Database Normalization
Dealing with Dates and Times
Executing External Programs
Session 6: Working with MySQL Database & Tables
Creating MySQL Databases
Creating Tables
Selecting the Most Appropriate Data Type
Adding Field Modifiers and Keys
Selecting a Table Type
Understanding Database Normalization
Altering Table and Field Names
Altering Field Properties
Backing Up and Restoring Databases and Tables
Dropping Databases and Table Viewing Database, Table, and Field Information
Session 7: SQL and Performing Queries
Inserting Records
Editing and Deleting Records
Performing Queries
Retrieving Specific Columns
Filtering Records with a WHERE Clause
Using Operators
Sorting Records and Eliminating Duplicates
Limiting Results
Using Built-In Functions
Grouping Records
Joining Tables
Using Table and Column Aliases
Session 8: Working with PHP & MySQL
Managing Database Connections
Processing Result Sets
Queries Which Return Data
Queries That Alter Data
Handling Errors
Session 9: Java Script
Introduction to Javascript
Variables, operators, loops
Using Objects, Events
Common javascript functions
Javascript Validations
Session 10: Live PHP Project
Project Discussion
Requirements analysis of Project
Project code Execution
Project Testing
=>Html & Css Training:-
HTML,or Hypertext markup language,is a code that's used to write and structure every page on the internet .CSS(cascading style sheets),is an accompanying code that describes how to display HTML.both codes are hugely important in today's internet-focused world.
Session 1: Introduction to a Web Page
What is HTML?
Setting Up the Dreamweaver to Create XHTML
Creating Your First HTML page
Formatting and Adding Tags & Previewing in a Browser
Choosing an Editor
Project Management
Session 2: Working with Images
Image Formats
Introducing the IMG Tag
Inserting & Aligning Images on a Web Page
Detailing with Alt, Width & Height Attributes
Session 3: Designing with Tables
Creating Tables on a Web Page
Altering Tables and Spanning Rows & Columns
Placing Images & Graphics into Tables
Aligning Text & Graphics in Tables
Adding a Background Color
Building Pages over Tracer Images
Tweaking Layouts to Create Perfect Pages
Session 4: Creating Online Forms
Setting Up an Online Form
Adding Radio Buttons & List Menus
Creating Text Fields & Areas
Setting Properties for Form Submission
Session 5: Creating HTML Documents
Understanding Tags, Elements & Attributes
Defining the Basic Structure with HTML, HEAD & BODY
Using Paragraph Tag to assign a Title
Setting Fonts for a Web Page
Creating Unordered & Ordered and Definition Lists
Detailing Tags with Attributes
Using Heading Tags
Adding Bold & Italics
Understanding How a Browser Reads HTML
Session 6: Anchors and Hyperlink
Creating Hyperlinks to Outside Webs
Creating Hyperlinks Between Documents
Creating a link for Email Addresses
Creating a link for a Specific Part of a Webpage
Creating a link for a image
Session 7: Creating Layouts
Adding a Side Content Div to Your Layout
Applying Absolute Positioning
Applying Relative Positioning
Using the Float & Clear Properties
Understanding Overflow
Creating Auto-Centering Content
Using Fixed Positioning
Session 8: Introduction to CSS
What is CSS?
Internal Style Sheets, Selectors, Properties & Values
Building & Applying Class Selectors
Creating Comments in Your Code
Understanding Class and ID
Using Div Tags & IDs to Format Layout
Understanding the Cascade & Avoiding Conflicts
Session 9: Creative artwork and CSS
Using images in CSS
Applying texture
Graduated fills
Round corners
Transparency and semi-transparency
Stretchy boxes
Creative typography
Session 10: Building layout with CSS
A centered container
2 column layout
3 column layout
The box model
The Div Tag
Child Divs
Width & Height
Margin
Padding
Borders
Floating & Clearing Content
Using Floats in Layouts
Tips for Creating & Applying Styles
Session 11: CSS based navigation
Mark up structures for navigation
Styling links with pseudo classes
Building a horizontal navigation bar
Building a vertical navigation bar
Transparency and semi-transparency
CSS drop down navigation systems
Session 12: Common CSS problems
Browser support issues
Float clearing issues
Validating your CSS
Common validation errors
Session 13: Some basic CSS properties
Block vs inline elements
Divs and spans
Border properties
Width, height and max, min
The auto property
Inlining Styles
Arranging Layers Using the Z Index
Session 14: Layout principles with CSS
Document flow
Absolute positioning
Relative positioning
Static positioning
Floating elements
Session 15: Formatting Text
Why Text Formatting is Important
Choosing Fonts and Font Size
Browser-Safe Fonts
Applying Styles to Text
Setting Line Height
Letter Spacing (Kerning)
Other Font Properties
Tips for Improving Text Legibility
Session 16: Creating a CSS styled form
Form markup
Associating labels with inputs
Grouping form elements together
Form based selectors
Changing properties of form elements
Formatting text in forms
Formatting inputs
Formatting form areas
Changing the appearance of buttons
Laying out forms
Session 17: Styling a data table
Basic table markup
Adding row and column headers
Simplifying table structure
Styling row and column headings
Adding borders
Formatting text in tables
Laying out and positioning tables
=>Wordpress Training:-
Our course in wordpress has been designed from a beginners perspective to provide a step by step guide from ground up to going live with your wordpress website.is not only covers the conceptual framework of a wordpress based system but also covers the practical aspects of building a modern website or a blog.
Session 1: WordPress Hosting and installation options
CMS Introduction
Setting up Web Hosting
Introduction to PHP
Registering a Domain Name
Downloading and Installing WordPress on your Web Space
Session 2: WordPress Templates
Adding a pre-existing site template to WordPress
Creating and adding your own site template to WordPress
Note - this is an overview of templates - for in-depth coverage we offer an Advanced WordPress Course
Session 3: Configuring WordPress Setup Options
When and How to Upgrade Wordpress
Managing User Roles and Permissions
Managing Spam with Akismet
Session 4: Adding WordPress Plugins
Downloading and Installing plugins
Activating Plugins
Guide to the most useful WordPress plugins
Session 5: Adding Content
Posts vs Pages
Adding Content to Posts & Pages
Using Categories
Using Tags
Managing User Comments
Session 6: Managing Media in WordPress
Uploading Images
Basic and Advanced Image Formatting
Adding Video
Adding Audio
Managing the Media Library
Session 7: Live Wordpress Project
Project Discussion
Requirements analysis of Project
Project code Execution
Project Testing
2>IPHONE TRAINING:-
Learn iphone app development using mac systems,Xcode 4.2,iphone device 4/4S/ipad, ios 5 for high quality incredible results.with us, you can get on your path to success as an app developer and transform from a student into a professional.
Iphone app app development has made online marketing a breeze .with one touch,you can access millions of apps available in the market. The demand for iphones is continually rising to new heights - thanks to its wonderful features. And these features are amplified by adding apps to the online apple store.
The apple store provides third party services the opportunity to produce innovative application to cater to the testes and inclinations of their customers and get them into a live iphone app in market.
Session 1: Introduction to Mac OS X / iPhone IOS Technology overview
Iphone OS architecture
Cocoa touch layer
Iphone OS developer tool
Iphone OS frameworks
Iphone SDK(installation,tools,use)
Session 2: Introduction to Objective – C 2.0 Programming language / Objective C2.0 Runtime Programming
Foundation framework
Objects,class,messaging,properties
Allocating and initializing objects,selectors
Exception handling,threading,remote messaging
Protocols ,categories and extensions
Runtime versions and platforms/interacting with runtime
Dynamic method resolution,Message forwarding,type encodings
Memory management
Session 3: Cocoa Framework fundamentals
About cocoa objects
Design pattern
Communication with objects
Cocoa and application architecture on Mac OS X
Session 4: Iphone development quick start
Overview of native application
Configuring application/running applications
Using iphone simulator/managing devices
Session 5: View and navigation controllers
Adding and implementing the view controller/Nib file
Configuring the view
Table views
Navigation and interface building
AlertViews
Session 6: Advanced Modules
SQLite
User input
Performance enhancement and debugging
Multi touch functions,touch events
Core Data
Map Integration
Social Network Integration (Facebook, Twitter , Mail)
Session 7: Submitting App to App Store
Creating and Downloading Certificates and Provisioning Profiles
Creating .ipa using certificates and provisioning profiles
Uploading App to AppStore
3>Android training:- The training programme and curriculum has designed in such a smart way that the student could familiar with industrial professionalism since the beginning of the training and till the completion of the curriculum.
Session 1: Android Smartphone Introduction
Session 2: ADLC(Android Development Lifecycle)
Session 3: Android Setup and Installation
Session 4: Basic Android Application
Session 5: Android Fundamentals
Android Definition
Android Architecture
Internal working of Android Applications on underlying OS
Session 6: Activity
Activity Lifecycle
Fragments
Loaders
Tasks and Back Stack
Session 7: Android Application Manifest File
Session 8: Intent Filters
Session 9: User Interface
View Hierarchy
Layout Managers
Buttons
Text Fields
Checkboxes
Radio Buttons
Toggle Buttons
Spinners
Pickers
Adapters
ListView
GridView
Gallery
Tabs
Dialogs
Notifications
Menu
WebView
Styles and Themes
Search
Drag and Drop
Custom Components
Session 10: Android Design
Session 11: Handling Configuration
Session 12: Resource Types
Session 13: Android Animation
View Animation
Tween Animation
Frame animation
Property Animation
Session 14: Persistent data Storage
Shared Preference
Preference Screen
Sqlite Database
Session 15: Managing Long Running Processes
UI Thread
Handlers and Loopers
Causes of ANR issue and its solution
Session 16: Services
Service Lifecycle
Unbound Service
Bound Service
Session 17: Broadcast Receivers
Session 18: Content Providers
Session 19: Web Services
Http Networking
Json Parsing
Xml Parsing
Session 20: Google Maps
Session 21: Android Tools
Session 22: Publishing your App on Google market
4> java training:-We provide best java training in jodhpur, wscube tech one of the best result oriented java training company in jodhpur ,its offers best practically, experimental knowledge by 5+ year experience in real time project.we provide basic and advance level of java training with live project with 100%job placement assistance with top industries.
Session 1 : JAVA INTRODUCTION
WHAT IS JAVA
HISTORY OF JAVA
FEATURES OF JAVA
HELLO JAVA PROGRAM
PROGRAM INTERNAL
JDK
JRE AND JVM INTERNAL DETAILS OF JVM
VARIABLE AND DATA TYPE UNICODE SYSTEM
OPERATORS
JAVA PROGRAMS
Session 2 : JAVA OOPS CONCEPT
ADVANTAGE OF OOPS,OBJECT AND CLASS
METHOD OVERLOADING
CONSTRUCTOR
STATIC KEYWORD
THIS KEYWORD
INHERITANCE METHOD
OVERRIDING
COVARIANT RETURN TYPE
SUPER KEYWORD INSTANCE INITIALIZER BLOCK
FINAL KEYWORD
RUNTIME POLYMORPHISM
DYNAMIC BINDING
INSTANCE OF OPERATOR ABSTRACT CLASS
INTERFACE ABSTRACT VS INTERFACE PACKAGE ACCESS ODIFIERS
ENCAPSULATION
OBJECT CLASS
JAVA ARRAY
Session 3 : JAVA STRING
WHAT IS STRING
IMMUTABLE STRING
STRING COMPARISON
STRING CONCATENATION
SUBSTRING METHODS OF STRING CLASS
STRINGBUFFER CLASS
STRINGBUILDER CLASS
STRING VS STRINGBUFFER
STRINGBUFFER VS BUILDER
CREATING IMMUTABLE CLASS
TOSTRING METHOD STRINGTOKENIZER CLASS
Session 4 : EXCEPTION HANDLING
WHAT IS EXCEPTION
TRY AND CATCH BLOCK
MULTIPLE CATCH BLOCK
NESTED TRY
FINALLY BLOCK
THROW KEYWORD
EXCEPTION PROPAGATION
THROWS KEYWORD
THROW VS THROWS
FINAL VS FINALLY VS FINALIZE
EXCEPTION HANDLING WITH METHOD OVERRIDING
Session 5 : JAVA INNER CLASS
WHAT IS INNER CLASS
MEMBER INNER CLASS
ANONYMOUS INNER CLASS
LOCAL INNER CLASS
STATIC NESTED CLASS
NESTED INTERFACE
Session 6 : JAVA MULTITHREADING
WHAT IS MULTITHREADING
LIFE CYCLE OF A THREAD
CREATING THREAD
THREAD SCHEDULER
SLEEPING A THREAD
START A THREAD TWICE
CALLING RUN() METHOD JOINING A THREAD
NAMING A THREAD
THREAD PRIORITY
DAEMON THREAD
THREAD POOL
THREAD GROUP
SHUTDOWNHOOK PERFORMING MULTIPLE TASK
GARBAGE COLLECTION
RUNTIME CLASS
Session 7 : JAVA SYNCHRONIZATION
SYNCHRONIZATION IN JAVA
SYNCHRONIZED BLOCK
STATIC SYNCHRONIZATION
DEADLOCK IN JAVA
INTER-THREAD COMMUNICATION
INTERRUPTING THREAD
Session 8 : JAVA APPLET
APPLET BASICS
GRAPHICS IN APPLET
DISPLAYING IMAGE IN APPLET
ANIMATION IN APPLET
EVENT HANDLING IN APPLET
JAPPLET CLASS
PAINTING IN APPLET
DIGITAL CLOCK IN APPLET
ANALOG CLOCK IN APPLET
PARAMETER IN APPLET
APPLET COMMUNICATION
JAVA AWT BASICS
EVENT HANDLING
Session 9 : JAVA I/O
INPUT AND OUTPUT
FILE OUTPUT & INPUT
BYTEARRAYOUTPUTSTREAM
SEQUENCEINPUTSTREAM
BUFFERED OUTPUT & INPUT
FILEWRITER & FILEREADER
CHARARRAYWRITER
INPUT BY BUFFEREDREADER
INPUT BY CONSOLE
INPUT BY SCANNER
PRINTSTREAM CLASS
COMPRESS UNCOMPRESS FILE
PIPED INPUT & OUTPUT
Session 10 : JAVA SWING
BASICS OF SWING
JBUTTON CLASS
JRADIOBUTTON CLASS
JTEXTAREA CLASS
JCOMBOBOX CLASS
JTABLE CLASS
JCOLORCHOOSER CLASS
JPROGRESSBAR CLASS
JSLIDER CLASS
DIGITAL WATCH GRAPHICS IN SWING
DISPLAYING IMAGE
EDIT MENU FOR NOTEPAD
OPEN DIALOG BOX
JAVA LAYOUTMANAGER
Session 11 : JAVA JDBC and Online XML Data Parsing
Database Management System
Database Manipulations
Sqlite Database integration in Java Project
XML Parsing Online
Session 12 : Java Projects
NOTEPAD
PUZZLE GAME
PIC PUZZLE GAME
TIC TAC TOE GAME
Crystal App
Age Puzzle
BMI Calculator
KBC Game Tourist App
Meditation App
Contact App
Weather App
POI App
Currency Convertor
5>Python training:Wscube tech provides python training in jodhpur .we train the students from basic level to advanced concepts with a real-time environment.we are the best python training company in jodhpur.
Session 1 : Introduction
About Python
Installation Process
Python 2 vs Python 3
Basic program run
Compiler
IDLE User Interface
Other IDLE for Python
Session 2: Types and Operations
Python Object Types
Session 3 : Numeric Type
Numeric Basic Type
Numbers in action
Other Numeric Types
Session 4 : String Fundamentals
Unicode
String in Action
String Basic
String Methods
String Formatting Expressions
String Formatting Methods Calls
Session 5 : List and Dictionaries
List
Dictionaries
Session 6 : Tuples, Files, and Everything Else
Tuples
Files
Session 7 : Introduction Python Statements
Python’s Statements
Session 8 : Assignments, Expression, and Prints
Assignments Statements
Expression Statements
Print Operation
Session 9 : If Tests and Syntax Rules
If-statements
Python Syntax Revisited
Truth Values and Boolean Tests
The If/else ternary Expression
The if/else Ternary Expression
Session 10 : while and for loops
while Loops
break, continue, pass , and the Loop else
for Loops
Loop Coding Techniques
Session 11 : Function and Generators
Function Basic
Scopes
Arguments
Modules
Package
Session 12 : Classes and OOP
OOP: The Big Picture
Class Coding Basics
Session 13 : File Handling
Open file in python
Close file in python
Write file in python
Renaming and deleting file in python
Python file object method
Package
Session 14 : Function Basic
Why use Function?
Coding function
A First Example: Definitions and Calls
A Second Example : Intersecting Sequences
Session 15 :Linear List Manipulation
Understand data structures
Learn Searching Techniques in a list
Learn Sorting a list
Understand a stack and a queue
Perform Insertion and Deletion operations on stacks and queues
6>wordpress training:We will start with wordpress building blocks and installation and follow it with the theory of content management.we will then learn the major building blocks of the wordpress admin panel.the next unit will teach you about posts,pages and forums.and in last we done about themes which makes your site looks professional and give it the design you like.
Session 1: WordPress Hosting and installation options
CMS Introduction
Setting up Web Hosting
Introduction to PHP
Registering a Domain Name
Downloading and Installing WordPress on your Web Space
Session 2: WordPress Templates
Adding a pre-existing site template to WordPress
Creating and adding your own site template to WordPress
Note - this is an overview of templates - for in-depth coverage we offer an Advanced WordPress Course
Session 3: Configuring WordPress Setup Opt
When and How to Upgrade Wordpress
Managing User Roles and Permissions
Managing Spam with Akismet
Session 4: Adding WordPress Plugins
Downloading and Installing plugins
Activating Plugins
Guide to the most useful WordPress plugins
Session 5: Adding Content
Posts vs Pages
Adding Content to Posts & Pages
Using Categories
Using Tags
Managing User Comments
Session 6: Managing Media in WordPress
Uploading Images
Basic and Advanced Image Formatting
Adding Video
Adding Audio
Managing the Media Library
Session 7: Live Wordpress Project
Project Discussion
Requirements analysis of Project
Project code Execution
Project Testing
7>laravel training:Wscube tech jodhpur provide popular and most important MVC frameworks ,laravel using laravel training you can create web application with speed and easily.and before start training we done the basic introduction on framework.
Session 1 : Introduction
Overview of laravel
Download and Install laravel
Application Structure of laravel
Session 2 : Laravel Basics
Basic Routing in laravel
Basic Response in laravel
Understanding Views in laravel
Static Website in laravel
Session 3 : Laravel Functions
Defining A Layout
Extending A Layout
Components & Slots
Displaying Data
Session 4: Control Structures
If Statements
Loops
The Loop Variable
Comments
Session 5: Laravel Advanced Concepts
Intallation Packages
Routing
Middelware
Controllers
Forms Creating by laravel
Managing Sessions And Using Session Variables
Creating A Session And Registering Session Variables
Destroying A Session
Laravel - Working With Database
Session 6: SQL And Performing Queries
Inserting Records
Editing And Deleting Records
Retrieving Specific Columns
Filtering Records With A WHERE Clause
Sorting Records And Eliminating Duplicates
Limiting Results
Ajax
Sending Emails
Social Media Login
Session 7: Live Project
8>industrial automation engineer training :Automation is all about reducing human intervention .sometime it is employed to reduce human drudgery (e.g. crane,domestic,washing machine),sometime for better quality & production (e.g. CNC machine).some products can not be manufactured without automated machine (e.g. toothbrush,plastic,bucket,plastic pipe etc).
To replace a human being ,an automation system also needs to have a brain,hands,legs,muscles,eyes,nose.
Session 1:Introduction to Automaton
What is Automation
Components of Automation
Typical Structure of Automation
History & Need of Industrial Automation
Hardware & Software of Automation
Leading Manufacturers
Areas of Application
Role of Automation Engineer
Career & Scope in Industrial Automation
Session 2: PLC (Programmable Logic Controller)
Digital Electronics Basics
What is Control?
How does Information Flow
What is Logic?
Which Logic Control System and Why?
What is PLC (Programmable Logic Controller)
History of PLC
Types of PLC
Basic PLC Parts
Optional Interfaces
Architecture of PLC
Application and Advantage of PLCs
Introduction of PLC Networking (RS-232,485,422 & DH 485, Ethernet etc)
Sourcing and Sinking concept
Introduction of Various Field Devices
Wiring Different Field Devices to PLC
Programming Language of a PLC
PLC memory Organization
Data, Memory & Addressing
Data files in PLC Programming
PLC Scan Cycle
Description of a Logic Gates
Communication between PLC & PC
Monitoring Programs & Uploading, Downloading
Introduction of Instructions
Introduction to Ladder Programming
Session 3: Programming Of PLC (Ladder Logics)
How to use Gates, Relay Logic in ladder logic
Addressing of Inputs/Outputs & Memory bit
Math’s Instruction ADD, SUB, MUL, DIV etc.
Logical Gates AND, ANI, OR, ORI, EXOR, NOT etc.
MOV, SET, RST, CMP, INC, DEC, MVM, BSR, BSL etc.
How to Programming using Timer & Counter
SQC, SQO, SQL, etc.
Session 4:Advance Instruction in PLC
Jump and label instruction.
SBR and JSR instruction.
What is Forcing of I/O
Monitoring & Modifying Data table values
Programming on real time applications
How to troubleshoot & Fault detection in PLC
Interfacing many type sensors with PLC
Interfacing with RLC for switching
PLC & Excel communication
Session 5: SCADA
Introduction to SCADA Software
How to Create new SCADA Project
Industrial SCADA Designing
What is Tag & how to use
Dynamic Process Mimic
Real Time & Historical Trend
Various type of related properties
Summary & Historical Alarms
How to create Alarms & Event
Security and Recipe Management
How to use properties like Sizing, Blinking, Filling, Analog Entry, Movement of Objects, Visibility etc.
What is DDE Communication
Scripts like Window, Key, Condition & Application
Developing Various SCADA Applications
SCADA – Excel Communication
PLC – SCADA Communication
Session 6:Electrical and Panel Design
Concept of earthling, grounding & neutral
Study and use of Digital Multimeter
Concept of voltmeter & Ammeter connection
Definition of panel
Different Types of panel
Relay & contactor wiring
SMPS(Switch mode power supply)
Different type protection for panel
Application MCB/MCCB
Different Instruments used in panel (Pushbuttons, indicators, hooters etc)
Different type of symbols using in panel
Maintains & Troubleshooting of panel
Study of live distribution panel
Session 7: Industrial Instrumentation
Definition of Instrumentation.
Different Types of instruments
What is Sensors & Types
What is Transducers & Types
Transmitter & Receivers circuits
Analog I/O & Digital I/O
Different type sensors wiring with PLC
Industrial Application of Instrumentation
Flow Sensors & meters
Different type of Valves wiring
Proximate / IR Sensors
Inductive /Metal detector
Session 8: Study of Project Documentation
Review of Piping & Instrumentation Diagram (P&ID)
Preparation of I/O list
Preparation of Bill Of Material (BOM)
Design the Functional Design Specification (FDS)
Preparing Operational Manuals (O & M)
Preparing SAT form
Preparing Panel Layout, Panel wiring and Module wiring in AutoCAD.
9> digital marketing training: The digital marketing training course designed to help you master the essential disciplines in digital marketing ,including search engine optimization,social media,pay-per-click,conversion optimization,web analytics,content marketing,email and mobile marketing.
Session 1: Introduction To Digital Marketing
What Is Marketing?
How We Do Marketing?
What Is Digital Marketing?
Benefits Of Digital Marketing
Comparing Digital And Traditional Marketing
Defining Marketing Goals
Session 2: Search Engine Optimization (SEO)
Introduction To Search Engine
What Is SEO?
Keyword Analysis
On-Page Optimization
Off-Page Optimization
Search Engine Algorithms
SEO Reporting
Session 3: Search Engine Marketing (SEM
Introduction To Paid Ad
Display Advertising
Google Shopping Ads
Remarketing In AdWords
Session 4: Social Media Optimization (SMO)
Role Of Social Media In Digital Marketing
Which Social Media Platform To Use?
Social Media Platforms – Facebook, Twitter, LinkedIn, Instagram, YouTube And Google+
Audit Tools Of Social Media
Use Of Social Media Management Tools
Session 5: Social Media Marketing (SMM)
What Are Social Media Ads?
Difference Between Social Media And Search Engine Ads.
Displaying Ads- Facebook, Twitter, LinkedIn, Instagram & YouTube
Effective Ads To Lead Generation
Session 6: Web Analytics
What Is Analysis?
Pre-Analysis Report
Content Analysis
Site Audit Tools
Site Analysis Tools
Social Media Analysis Tool
Session 7: Email Marketing
What Is Email Marketing
Why EMail Marketing Is Necessary?G
How Email Works?
Popular Email Marketing Software
Email Marketing Goals
Best Ways To Target Audience And Generate Leads
Introduction To Mail Chimp
Email Marketing Strategy
Improving ROI With A/B Testing
Session 8: Online Reputation Management (ORM)
What Is ORM?
Why ORM Is Important?
Understanding ORM Scenario
Different Ways To Create Positive Brand Image Online
Understanding Tools For Monitoring Online Reputation
Step By Step Guide To Overcome Negative Online Reputation
Session 9: Lead Generation
What Is Lead Generation
Lead Generations Steps
Best Way To Generate Lead
How To Generate Leads From – LinkedIn, Facebook, Twitter, Direct Mail, Blogs, Videos, Infographics, Webinar, Strong Branding, Media
Tips To Convert Leads To Business
Measure And Optimize
Session 10: Lead Generation
What Is Affiliate Marketing
How Affiliate Marketing Works
How To Find Affiliate Niche
Different Ways To Do Affiliate Marketing
Top Affiliate Marketing Networks
Methods To Generate And Convert Leads
Session 11: Content Marketing
What Is Content Marketing?
Introduction To Content Marketing
Objective Of Content Marketing
Content Marketing Strategy
How To Write Great Compelling Content
Keyword Research For Content Ideas
Unique Ways To Write Magnetic Headlines
Tools To Help Content Creation
How To Market The Same Content On Different Platforms
Session 12: Mobile App Optimization
App store optimization (App name, App description, logo, screenshots)
Searched position of app
Reviews and downloads
Organic promotions of app
Paid Promotion
Session 13: Google AdSense
What is Google AdSense
How it Work?
AdSense Guidelines
AdSense setup
AdSense insights
Website ideas for online earning
10> robotics training:The lectures will guide you to write your very own software for robotics and test it on a free state of the art cross-platform robot simulator.the first few course cover the very core topics that will be beneficial for building your foundational skills before moving onto more advanced topics.End the journey on a high note with the final project and loss of confidence in skills you earned throughout the journey.
Session 1: Robotics Introduction
Introduction
Definition
History
Robotics Terminology
Laws of Robotics
Why is Robotics needed
Robot control loop
Robotics Technology
Types of Robots
Advantage & Disadvantage
ples of Robot
Session 2: Basic Electronics for Robotics
LED
Resistor
Ohm’s Law
Capacitor
Transistor
Bread board
DC Motor
DPDT switch
Rainbow Wire & Power Switch
Integrated Circuit
IC holder & Static Precaution
555 Timer & LM 385
L293D
LM 7805 & Soldering kit
Soldering kit Description
Soldering Tips
Soldering Steps
Projects
Session 3: Electronic Projects
a. Manual Robotic Car
Basic LED glow Circuit
LED glow using push button
Fading an LED using potentiometer
Darkness activation system using LDR
Light Activation system using LDR
Transistor as a NOT gate
Transistor as a touch switch
LED blinking using 555 timer
Designing IR sensor on Breadboard
Designing Motor Driver on Breadboard
Designing IR sensor on Zero PCB
Designing Motor Driver on Zero PCB
Line Follower Robot
Session 4: Sensors
Introduction to sensors
Infrared & PIR Senso
TSOP & LDR
Ultrasonic & Motion Sensors
Session 5: Arduino
a. What is Arduino
Different Arduino Boards
Arduino Shield
Introduction to Roboduino
Giving Power to your board
Arduino Software
Installing FTDI Drivers
Board & Port Selection
Port Identification – Windows
Your First Program
Steps to Remember
Session 6: Getting Practical
Robot Assembly
Connecting Wires & Motor cable
Battery Jack & USB cable
DC motor & Battery arrangement
Session 7: Programming
Basic Structure of program
Syntax for programming
Declaring Input & Output
Digital Read & Write
Sending High & Low Signals
Introducing Time Delay
Session 8: Arduino Projects
Introduction to basic shield
Multiple LED blinking
LED blinking using push button
Motor Control Using Push Button
Motor Control Using IR Sensor
Line Follower Robot
LED control using cell phone
Cell Phone Controlled Robot
Display text on LCD Display
Seven Segment Display
Session 8: Arduino Projects
Introduction to basic shield
Multiple LED blinking
LED blinking using push button
Motor Control Using Push Button
Motor Control Using IR Sensor
Line Follower Robot
LED control using cell phone
Cell Phone Controlled Robot
Display text on LCD Display
Seven Segment Display
11>SEO Training:SEO Search Engine Optimization helps search engines like google to find your site rank it better that million other sites uploaded on the web in answer to a query.with several permutation and combination related to the crawlers analyzing your site and ever changing terms and conditions of search engine in ranking a site,this program teaches you the tool and techniques to direct & increase the traffic of your website from search engines.
Session 1: Search engine Basics
Search Engines
Search Engines V/s Directories
Major Search Engines and Directories
How Search Engine Works
What is Search Engine Optimization
Page rank
Website Architecture
Website Designing Basics
Domain
Hosting
Session 2: Keyword Research and Analysis
Keyword Research
Competitor analysis
Finding appropriate Keywords
Target Segmentation
Session 3: On Page Optimization
Title
Description
Keywords
Anchor Texts
Header / Footer
Headings
Creating Robots File
Creating Sitemaps
Content Optimization
URL Renaming
HTML and CSS Validation
Canonical error Implementation
Keyword Density
Google Webmaster Tools
Google analytics and Tracking
Search Engine Submission
White Hat SEO
Black Hat SEO
Grey Hat SEO
Session 4: Off Page Optimization
Directory
Blogs
Bookmarking
Articles
Video Submissions
Press Releases
Classifieds
Forums
Link Building
DMOZ Listing
Google Maps
Favicons
QnA
Guest Postings
Session 5: Latest Seo Techniques & Tools
Uploading and website management
Seo Tools
Social media and Link Building
Panda Update
Penguin Update
EMD Update
Seo after panda , Penguin and EMD Update
Contact detail :-
a> WsCube Tech
First Floor, Laxmi Tower, Bhaskar Circle, Ratanada
Jodhpur - Rajasthan - India (342001)
b>Branch Office
303, WZ-10, Bal Udhyan Road,
Uttam Nagar, New-Delhi-59
c>Contact Details
Mobile : +91-92696-98122 , 85610-89567
E-mail : [email protected]
1 note
·
View note